Finally the Hiatus is over...
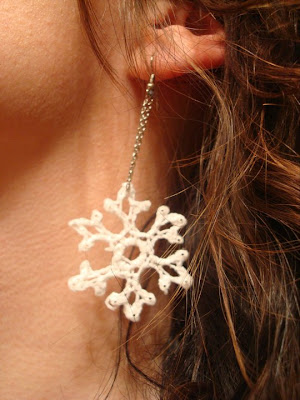
And thus I present (hehe) Ana's Snowflake Earrings!

So one of the things I made a TON of people this season was crocheted snowflakes, they don't take long and they were free because mom already had the threadsuff (bedspread weight cotton -size10). For the most part people liked them as ornaments for the tree. So I wanted to try one of the "small" ones but there was no finish measurement so I just went for it. It turned out tiny! I thought, "this is gonna get absolutely lost on a tree" so I took another 20 minutes and made a second one. VOILA! earrings! Really cute light-weight earrings! It was hard to part with them, but I imagine they look lovely on my good friend Ana. She'd make them beautiful. :)
Crochet Instructions
Chain 6; join with slip st to form a ring.
RND 1: Ch 1, * sc in ring, ch 5, slip st in second ch from hook and in next ch, ch 3, (dc, ch2, slp st) in third ch from hook, ch 3, slip st in second ch from hook and in next ch, slip st in remaining 2 chs of previous ch-5; repeat from * 5 times more; join with slip st to first sc, finish off.
Compliments of White Christmas in Thread Crochet from Kathryn A. Clark
Repeat again for second earring. It's best to do it right away so you have similar tension and such. Also don't worry about it being a perfect replica. No two snowflakes are alike in nature, yours won't be either. Imperfections add charm. :)

Blocking
1. Print off two of the blocking guide below and glue onto a scrap piece of cardboard or two (double thickness is somehow easier). Then cover it with saran wrap and tape to the back pulling it tight across the pattern.
2. Get your snowflakes damp, rolling them in your fingers to make sure the thread is really saturated. Then just grip them tight to get rid of the excess water (but still damp)
3. In a small cup or plastic bag (or whatever you like) pour some Elmer's glue. Roll the snowflake in it, squishing the thread and really rolling the glue in there. Make sure it's completely coated.
4. Lay the snowflakes out on the blocking guide. Using pins (T pins are the easiest) stretch the flakes out into the form you want. I started with a pin in the center to keep in even, then found the appropriate circle and made all the arms even.
5. Let your flakes dry overnight. Or until they feel stiff and completely dry. You don't want to pull them up too early or they'll be floppy.
6. Use one finger to stabilize the flake while you pull out the pins cause sometimes it likes to stick. Once all the pins are out carefully peel the snowflake off and you're done!
Snowflake Construction
To finish: Take a small piece of thin chain and thread it through one loop of one arm of the snowflake. Adjust the length until you like where it sits against your neck. (I have a short neck so that's not very long) Cut and measure the same length for the other earring. Attach to a earringhook (I had to thread through the chain on mine and tie them on). And you're done!
Now rock that ice princess look! Work it girl, work it!

So cool. I think i'll make one too! I wonder how they'd look dyed.... cheesy? or cool?
ReplyDeleteThat is awesome!
ReplyDeleteHmmm...I suppose it depends on what color you dye them. You might consider looking up doily patterns and just doing the little centers...then you could dye them any color and it wouldn't be too weird. ;)
ReplyDelete